Building and Deploying my personal blog with CI/CD across Dev, Stage & Prod environments.

About this project
I finally decided to make a blog worthy of a DevOps Engineer. Here it is, my Hugo blog built and deployed via CI/CD (Github Actions) across dev, staging and production environments (Github Environments). My blogging journey has been a really long one, from Blogger.com to Wordpress.com, to Wordpress.org. After a plethora of plugins, cracked and free alike, i fell in-love with static site generators. After Jekyll here I am enjoying Hugo.
I have attempted to make this project as modular as possible, such that (after going through the readme carefully) one could deploy their own site/blog from it.
Project Links:
To be clear, what am really selling is the dev, stage, and prod workflow, along with the Github Actions scripts (the workflow implementation). Deploying blogs with Hugo isn't, although i like it very much.
This project is really just an implementation of Github Environments. Although I have used my Hugo blog, you could take just the actions scripts and modify them to suit. You would in that case have to do quite a bit of modifications, though, because they were intended for a Hugo blog use-case from the beginning.
Deploying a ready site/blog from this project
1. Clone the project
2. Create the appropriate folders (or submodules)
2.1 Choose a Hugo Theme
This project uses the Hugo LoveIt theme. LoveIt is a beautiful, comprehensive blogging theme. If you decide to go ahead with it, there’re a few ways to do so:
2.1.1 Create a git submodule of the main LoveIt repository at the /themes/loveit directory. You do not need to edit the hugo.toml file to point to this since this project has that done already. The downfall of this method’s that you won’t be able to make changes to the theme files (unless of course you fancy contributing to the Loveit project).
2.1.2 Download the Loveit repository and store it at the /themes/loveit directory. This allow you edit the theme files as you desire. The downfall of this method is that theme LoveIt is considerably heavy, it would as a result make your first push to Github take a while. Second you would miss out on any new updates to the theme. You could always of course download the whole bunch again (and go through that bulky re-upload again).
2.1.3 Fork the LoveIt project, and create a git submodule pointing to your fork at the /themes/loveit directory. This is the recommended approach, and the one this project currently uses. This would allow you make any desired update to the theme files, while still being able to receive updates from the upstream LoveIt repo.
2.2 Create a ‘content’ directory
Depending on your theme of choice your site/blog Markdown content would typically go in the content directory. Theme LoveIt follows the content/page.md structure for pages and content/posts/post.md for posts.
You should pay attention to the content structure of whatever other Hugo theme you decide to use, and arrange your contents accordingly.
3. Review (& maybe modify) the Actions Workflows
You should review the steps in the different deployment environments of the Actions workflows, to understand it and maybe alter it as suits your use. To summarize, the workflow for this project goes as illustrated below.
Checkout codeSetup HugoBuildSetup Algolia CLIUpload search Index to AlgoliaDeploy build results to GH-Pages
Hugo Theme LoveIt comes with support for Algolia search, hence the additional steps of setting up Algolia CLI & uploading the search index.
4. Create the additional, required repos
To deploy to Github Pages using the actions workflow from this project, you would need to setup 2 additional repositories for hosting the static output from Hugo.
blog-production & blog-staging repositories (both of which i also made private).You would need to setup approriate access to these repositories too, to enable the workflow deploy to them.
5. Setup the required environment secrets and variables
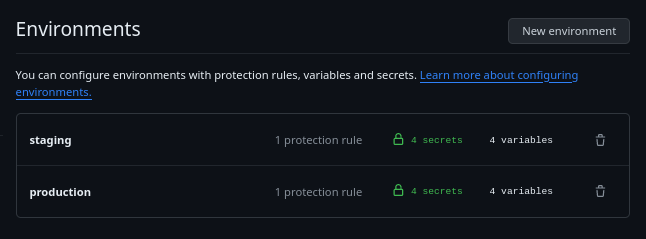
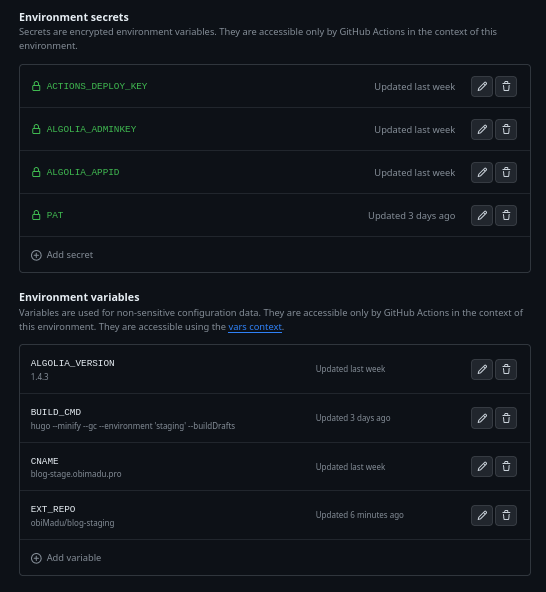
The below list contains all the different environment secrets and variables. The list of secrets and variables in the staging environment is, of course, a direct duplicate of all in the production environment, but with diffent, apporiate values.
Secrets
ACTIONS_DEPLOY_KEY:SSH Deploy key for the host Github Repos (blog-prod & blog-stage repos).ALGOLIA_APPID:APP ID for your Algolia search app.ALGOLIA_ADMINKEY:Admin Key for your Algolia search app.PAT: (Optional)Personal access token for accessing your blog content private repo.
Variables
ALGOLIA_VERSION:Algolia CLI version to use in the CD build.BUILD_CMD:Hugo build command for the specific environment.CNAME:Web address for Github Pages (with approriate DNS records already set).EXT_REPO:External repository for Github Pages static hosting. This takes the format ‘org/repo’.
When you’re all setup it should should look like these:


Additional Info & FAQs
1. Why’s the Hugo Build command a variable?
This allows for custom build commands for each of the different environments. For insance in the staging environmen for this project I build my blog with draft posts, via the Hugo ‘-D’ option. This allows me to view draft posts from my staging environment but not the production environment.
2. Why manually update the ‘posts’ submodule reference?
Adding a new commit for every important update (such as a ready new post) on the posts submodule triggers the github-pages action to re-deploy the blog. This is a hosting-on-github-pages constraint type of situation. The pages action wont re-deploy the blog if the commit points to that of the last deploy. As a result if we just checked-out the posts sub-directory at the CD script, there won’t be any new commit, and the changes don’t get deployed.